• Skip to primary navigation
  • Skip to main content
  • Skip to primary sidebar

Craig Hays

  • About
  • Articles
  • Newsletter
  • Contact
  • Show Search
Hide Search
You are here: Home / Archives for Cybersecurity Tutorials

Cybersecurity Tutorials

BeyondTrust Privileged Remote Access – Ultimate Deployment Guide

October 16, 2022 By Craig Hays Leave a Comment

Reading Time: 2 minutes

BeyondTrust Privileged Remote Access, if deployed correctly, can be an incredible tool to limit the damage that ransomware gangs can cause across all of your devices. This deployment guide covers how threat actors move through your network to steal data and spread ransomware, and how we can best deploy BeyondTrust Privileged Remote Access to prevent it.

How Ransomware Gangs Deploy Ransomware

The Mitre ATT&CK framework is an excellent, detailed, technical guide for the attack paths that threat actors can leverage in their pursuit of illicit gains. When deployed correctly, BeyondTrust Privileged Remote Access can be very effective at limiting their ability to:

  • Establish initial access into your network by restricting the use of remote administration tools to a single, centralised, MFA backed and audited method
  • Move laterally around your network by allowing you to block RDP, SSH, VNC, and other remote management tools between devices and networks and restricting administration access to the BeyondTrust platform only
  • Elevate privilege from Domain User to Domain Admin by ensuring that admin passwords are rotated after every use, never exposed to end users, and never used on unauthorised devices (e.g. Domain Admin accounts on standard servers).

By applying good cybersecurity principles while designing your implementation you can make life very difficult for would-be attackers to achieve their end goal.

BeyondTrust Privileged Remote Access Key Concepts

  • A Jump Client is an agent installed onto each server which provides secure, remote screen sharing (think console-like keyboard/mouse/screen access), file transfers, and device health information, and can be used to scan for and manage local Windows user accounts. The Jump Client agent runs as a service as the SYSTEM user and hooks into Windows internal functions to inject credentials at appropriate times.
  • A Jump Point is a server running the BeyondTrust SSH/RDP/VNC proxy application. A jump point server can be used to RDP to anything, even if a Jump Client is not installed. It can also discover and take ownership of Active Directory domain accounts.
  • A Jump Item is something which you can remotely manage through BeyondTrust. Not all jump items have jump clients installed. Some Jump Items are configuration only (pointers to IPs/hostnames).
  • A Jump Group is a collection of Jump Items. A Jump Client cannot be a member of more than one Jump Group.
  • A Remote RDP session is a BeyondTrust manged RDP session which originates at a jump point server. This means you can have more than one user connecting to a server at the same time (Jump Clients limit to 1 session but BeyondTrust users can share the session)
  • An Account Group is a collection of usernames/passwords or usernames/SSH keys (Accounts) managed by BeyondTrust. These credentials are rotated by the BeyondTrust platform and should not be changed manually. For most accounts, nobody should ever see the passwords as BeyondTrust will inject them into sessions on your behalf.

Nmap OS Detection: Easy, Fast, and Powerful Examples [How To Guide]

September 22, 2022 By Craig Hays Leave a Comment

Reading Time: 4 minutes

Nmap is one of my go-to tools for network discovery and asset detection and Nmap OS detection is a quick and powerful way to determine what operating system a remote device is running.

Basic Nmap OS Detection

The most basic version of the Nmap command for Operating System detection is:

nmap -O <target>

While it’s not always easy to tell on screen, the flag on this command is -O for Operating System. Not to be confused with the lowercase -o which is used for Output, or the number Zero.

<target> should be switched with whatever you’re trying to scan. That could be either the hostname of the target such as scanme.nmap.org, or the IP address of the target such as 45.33.32.156.

nmap os detection
Nmap OS detection in action

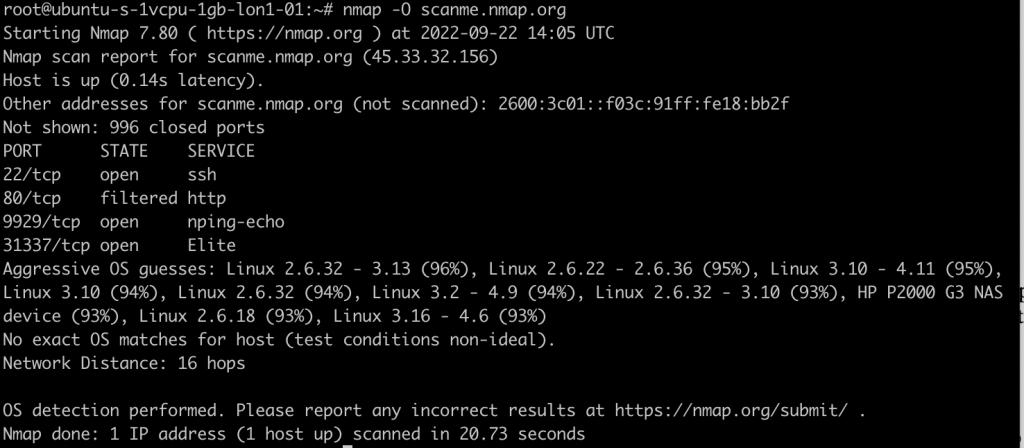
Nmap os detection confidence levels

As you’ll see in the above scan screenshot, Nmap doesn’t always know for sure the exact operating system in use by a target device. In those cases, it makes predictions with confidence levels shown as percentages, e.g. Linux 2.6.32 – 3.13 (96%). Because of how Nmap os detection works unless the device replies with the exact OS and version number this can be the best you can get. The more information Nmap can gather, the more accurate the prediction will be.

False positive reduction with Nmap os detection

Because of how os detection works, sometimes a basic -O scan will have many different high-confidence guesses and it’s possible that none of them are completely accurate. A good trick to remove the noise and confirm the underlying operating system is to run an aggressive Nmap scan with both OS and application version detection:

nmap -A -T4 &lt;target>

The -A flag includes -O for Operating System detection and upgrades it to Application version detection. The -T4 flag is for aggressive timing (T0 to T5, least to most aggressive). Application version detection can take quite a while with default timing so T4 helps to speed things up a little. It also makes it more obvious that you’re scanning so if stealth is important to you, keep it at T0 or T1.

nmap os and version detection

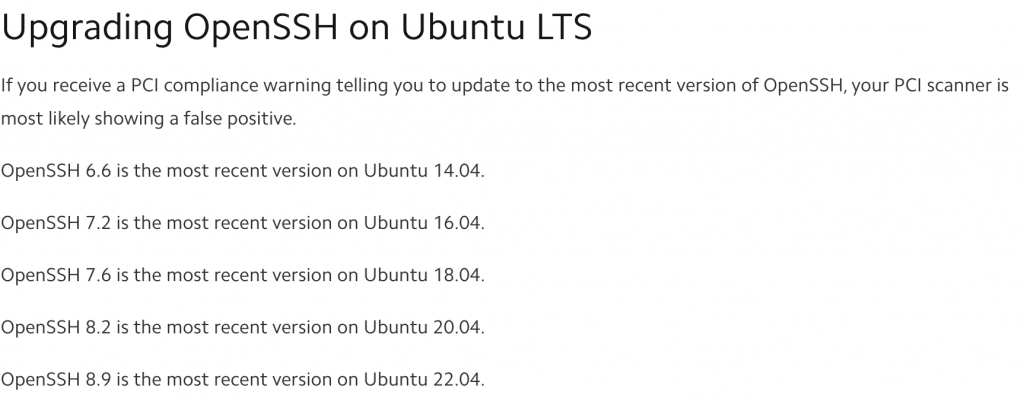
The screenshot above shows the result of an -A -T4 scan against the same target as before. Unfortunately, the Aggressive OS guesses are still the same. Thankfully, in this example, we can see that the OpenSSH version states 2ubuntu2.13 which indicates that the server is running on Ubuntu operating system. A quick Google for “ubuntu OpenSSH versions” indicates that the server is most likely to be running on ubuntu 14.04, assuming the server is fully patched.

Nmap os detection: ubuntu

Basic firewall evasion for Nmap os detection scans

Some servers and firewalls are configured to block ICMP ping scans and Nmap uses ping to test if a server is alive before trying to port scan it. To bypass this simply disable the default ping check by using the command:

nmap -O -Pn <target>

The -Pn flag disables the ping check: no Ping aka Ping:no. Nmap then assumes that the host is up and performs a port scan and os detection scan. This can be combined with other scan types such as:

nmap -Pn -A -T4 <target>

The result is a scan that skips ping checks, tests for operating system versions and application versions, and runs aggressively with probing messages sent rapidly for faster results.

These scans are easily detected and blocked by modern, advanced, and well-configured firewalls. Fortunately, most devices aren’t protected by modern, advanced firewalls. Those that are, more often than not, are poorly configured.

Advanced firewall evasion

The reality is, if a host is detecting and blocking anything above the most simple and basic Nmap scans then your attempts at os detection are going to fail more often than not.

In these situations, you’ll need to consider more passive approaches such as Open Source Intelligence (OSINT) to find the information you need. This could include looking at job openings to identify the tech stack used within a company, looking for the technologies deployed to a device in case they are OS exclusive (e.g. Microsoft IIS only runs on Windows), and so on.

How does Nmap OS detection work?

Nmap OS detection works by using a technique called TCP/IP Stack Fingerprinting. While TCP/IP is a mature and well document standard, different operating systems have implemented these protocols in slightly different ways. They are still compliant with the specification and can still talk to each other without problems, but the subtle differences in how each operating system handles ambiguities in the specification can be used to identify the underlying operating system of a network-connected device.

The Nmap developers maintain a thorough and comprehensive database of operating system and application version signatures which are installed with every installation of Nmap. It’s important to keep Nmap up to date in order to download the most recent signature updates for new operating systems and applications.

The Nmap official book explains the inner workings in detail, but in a nutshell:

Nmap OS fingerprinting works by sending up to 16 TCP, UDP, and ICMP probes to known open and closed ports of the target machine. These probes are specially designed to exploit various ambiguities in the standard protocol RFCs. Then Nmap listens for responses. Dozens of attributes in those responses are analyzed and combined to generate a fingerprint.

https://nmap.org/book/osdetect-methods.html

Microsoft LAPS: Setup, Install, Use, And Secure With Multi-Factor Authentication

September 9, 2022 By Craig Hays Leave a Comment

Reading Time: 7 minutes

The ultimate guide to deploying, configuring, securing, and using LAPS to mitigate the impact of ransomware attacks.

What is Microsoft LAPS

Microsoft LAPS ultimate guide

Microsoft LAPS is short for Microsoft Local Administrator Password Solution. When installed and enabled on domain-joined computers it takes over the management of passwords of local accounts. Passwords are automatically changed to random characters that meet the domain’s password policy requirements at a frequency that you define through Group Policy.

The passwords are stored in a protected “confidential” attribute on the Computer object in AD. Unlike most other attributes which can be read by all domain users by default, the confidential attributes require extra privileges to be granted in order to read them, thus securing the managed passwords.

Is Microsoft LAPS free?

Yes. Microsoft LAPS is completely free.

How does Microsoft LAPS work?

There are four components to the Local Administrator Password Solution:

  1. The 32-bit or 64-bit LAPS client you install on computers in the domain
  2. A Group Policy configuration that enables and configures the LAPS management policy on computers included in scope
  3. The Active Directory domain in which the managed computers can be found. The computer objects in this domain store the randomised passwords inside a protected attribute.
  4. Management tools, including a thick client GUI, a powershell module, and Group Policy templates.

When you first enable LAPS on a domain you add two new attributes to the domain schema for Computer objects:

  1. ‘ms-mcs-admpwd’ is used to store the password for the local administrator account
  2. ‘ms-mcs-admpwdexpirationtime’ is used to store a timestamp of when the current password will expire. This is defined in the Group Policy settings which we’ll get to in a bit.

How does a Computer update its local admin password through LAPS?

Password changes take place during group policy updates (gpupdate). A computer performs a group policy update when it first starts up, when a user signs in, and every 90 minutes after that by default. Because of this, LAPS can only change passwords when a domain controller is reachable. If you take a laptop home and do not connect to a VPN, the LAPS client will not rotate passwords.

So what actually happens when the LAPS client executes during a group policy update execution?

  1. The LAPS client is executed. It queries the ms-mcs-admpwdexpirationtime of it’s own computer object within AD. If an Active Directory domain controller is unreachable then the entire gpupdate skips, including the LAPS password check.
  2. The ms-mcs-admpwdexpirationtime timestamp is compared to the current time. If ms-mcs-admpwdexpirationtime is in the future, nothing happens. If ms-mcs-admpwdexpirationtime is in the past, the current password is flagged as expired and must be changed.
  3. The LAPS client creates a new password which meets the minimum requirements of the password policy set for the computer object and changes the password of the local administrator account.
  4. The LAPS client updates the ms-mcs-admpwd attribute on its computer object in the Active Directory database. Computers have full permission to edit their own attributes so this still works even through ms-mcs-admpwd is protected.
  5. The LAPS client updates the ms-mcs-admpwdexpirationtime to show the new expiration time based on whatever is configured through Group Policy.

If a domain controller cannot be reached, passwords do not change. This is useful for remote support as you know that when users are working from home you still have a valid local administrator password in AD which will continue to work until they connect to a VPN or come back to the office.

How do you get Microsoft LAPS?

As of the Windows 11 Build 25145.1011 (KB5016159), the Microsoft LAPS client comes installed natively as part of the Windows Operating System. For all older installations of Windows and for Windows Server you can download the Microsoft LAPS client installation files from www.microsoft.com/en-us/download/details.aspx?id=46899

The download page offers the following files:

  • LAPS.x86.msi – a 32-bit Microsoft Software Installer file for the LAPS client
  • LAPS.x64.msi – a 64-bit Microsoft Software Installer file for the LAPS client
  • LAPS.ARM64.msi – a 64-bit Microsoft Software Installer file for the LAPS client compiled for devices running on the ARM architecture instead of Intel or AMD.
  • LAPS_OperationsGuide.docx – A document describing how to deploy the LAPS client, configure group policy, and grant users permission to read the LAPS ms-mcs-admpwd attribute
  • LAPS_Datasheet.docx –
  • LAPS_TechnicalSpecification.docx –

Minimum Requirements

The Microsoft Local Administrator Password Solution (LAPS) client, also known as the Group Policy Client Side Extension (GP CSE), supports:

Supported Server Operating Systems

  • Windows Server 2022
  • Windows Server 2019
  • Windows Server 2016
  • Windows Server 2012 R2
  • Windows Server 2012
  • Windows Server 2008 R2
  • Windows Server 2008
  • Windows Server 2003

Supported Client Operating Systems

  • Windows 10
  • Windows 8.1
  • Windows 8
  • Windows 7
  • Windows Vista

Note: Windows 11 is not included as LAPS is now a native feature of Windows.

Active Directory Domain Services

Active Directory requires: 
  • Windows 2003 SP1 or later (requires AD schema extension to add the ms-mcs-admpwd and ms-mcs-admpwdexpirationtime object attributes)

The default management toolset requires:

  • NET Framework 4.0
  • PowerShell 2.0 or later

Is Microsoft LAPS secure?

It certainly should be but the true answer, like most things, is ‘that depends’. Provided you install it according to best practices, and adhere to good cyber security principles, then yes, LAPS is as secure as you would hope it to be.

Common mistakes people make when deploying LAPS include:

  • Not requiring multi-factor authentication (MFA) in order to view a LAPS managed password
  • Granting too broad a level of access to individual user accounts
  • Not requiring separate admin-only accounts, not used for browsing the web or reading email, for viewing LAPS passwords
  • Not applying rate limits to the number of passwords which can be viewed
  • Not monitoring and alerting on suspicious viewing and usage of LAPS-managed passwords

When should LAPS not be used?

LAPS should never be enabled on domain controllers. The last place you want your domain controller built-in administrator account passwords is in your Active Directory database for anyone with general LAPS visibility to read.

How to Setup Microsoft LAPS

How do I use Microsoft LAPS?

How to use LAPS to mitigate ransomware attacks

When deployed in the right way, Microsoft LAPS can be a highly effective tool to contain, slow down the spread of, and even mitigate the impact of ransomware attacks. In order to describe how this can be done, it is essential to understand how ransomware attacks happen.

Domain Compromise

When a ransomware gang attacks an organisation, their attacks typically follow this pattern:

  1. First, they gain a foothold into a network. This can happen by:
    1. Exploiting unpatched or otherwise vulnerable internet-accessible software
    2. Compromising valid accounts and entering a network via remote access services such as a VPN
    3. Delivering malicious software to an unsuspecting victim by email who then opens and executes it.
  2. Then they elevate from Domain User to Administrator of as many systems as possible. This can be achieved by:
    1. Obtaining Domain Admin or equivalent credentials.
    2. Obtaining one or more Local Admin credentials that work on lots of different computers. These can be Domain Users who are in the local Administrators group on more than one computer or a single local account with the same password on many computers. e.g. ‘support’ or ‘helpdesk’ which is placed in the local Administrators group.
    3. Obtaining hundreds of Local Admin credentials, each of which works on a single computer, for example, by exploiting a poor configuration of Microsoft LAPS.
  3. Next, they use the harvested credentials to steal and exfiltrate data
  4. Finally, they use the harvested credentials to encrypt files on as many computers in the organisation as quickly as possible.

The root cause of the problem described above is the abuse of a small number of passwords, often just one, that provides Administrator access to many or all computers in a domain. Microsoft LAPS helps to prevent this problem by randomising the password of the built-in Administrator account on all computers in the domain to which LAPS is deployed. It doesn’t solve the problem though as organisations tend to add or leave additional accounts in the local administrators group.

Damage Control – Containing the impact of a compromised administrator password

In order to limit the damage the compromise of a single administrator password can cause, the principle of ‘One Computer, One Admin, One Unique Password‘ should be followed. As standard, the only members of the Administrators group on each computer should be:

  • .\Administrator (the local built-in administrator account, managed by Microsoft LAPS)
  • DOMAIN\Domain Admins (and no Domain Admin should sign in to any device which is not a Domain Controller)

All users should sign in as Domain/Local User and elevate to admin using ‘run as’ -> .\Administrator to temporarily execute as admin, or log out and log in as .\Administrator for use cases where ‘run as’ will not work.

Unless you’re using some other Privileged Access Management tool to manage and randomise passwords, no other accounts should be members of the local Administrators group on each computer unless it is absolutely unavoidable. If this does happen, the more computers the same password works on (Domain User in Local Administrators on more than one computer), the more damage can be caused if that password is compromised.

Require MFA to view LAPS-managed passwords

With the standard set of management tools, authorised users can view LAPS-managed administrator passwords without re-verifying their identity. If their account is ever compromised it can be used by the attacker to view LAPS passwords. If they are authorised to view a large number of passwords their account can be used to compromise all of them by simply requesting the LAPS ms-mcs-admpwd attribute for each of them.

To protect against this, it is best to deploy a LAPS password viewer which implements controls such as Multi-Factor Authentication, rate-limiting, and good auditing and alerting. My preference is to use Lithnet Access Manager.

Lithnet Access Manager LAPS password viewer

Microsoft LAPS and Lithnet Access Manager with Azure App Proxy and MFA

Lithnet Access Manager is a web-based LAPS password viewer which supports rate limiting, simple group-based access control, usage auditing, and automatic password rotation after checkout and use.

Because it is a web-based solution we can deploy it through Azure App Proxy and use conditional access to require pre-authentication before the web app can be accessed, provide single sign-on from Azure AD through Kerberos delegation, require MFA for all sign-ins, limit session duration to whatever we wish (e.g. 1 hour) and require re-verification of identity through MFA regularly.

By blocking all direct access to the web application internally and forcing all users to go through Azure App Proxy we can easily wrap the whole thing with strong Azure AD access controls. It also means that it can be accessed on any mobile device which is great for on-the-go support technicians who can access LAPS passwords from their smartphones without being connected to the corporate network.

Installing Lithnet Access Manager LAPS Viewer

Deploy to all clients and servers. Use role-based access control. Link to Principles -> One computer, one admin account, one unique admin password. Prevents lateral movement and rapid encryption (provided your Domain Admins are safe). <Describe how it can be used as a low cost/free alternative to BeyondTrust Cyber Ark, Tycotic, etc.> Combine with <link to> RDS Gateway over Apache RDS thing for secure remote access and Azure PIM for just-in-time access to devices.

Dynamically create a phishing page based on the HTTP referer header

June 11, 2019 By Craig Hays 1 Comment

Reading Time: 3 minutes

Auto-generated phishing pages and the social web.

(The following is a cybersecurity research article on credential theft using non-traditional and underexploited phishing methods.)

You’re browsing the web. You’re logged into an online discussion space such as YouTube, Reddit, Twitter, Medium, a small community forum, etc. You click on a link from another user to another page on the same site. Instead of seeing the content you’re looking for you’re presented with the login page for the site you’re already on. Annoyed and a little confused as to why you’ve been logged out, you log back in and are taken to the content you were expecting.

You’ve just been phished.

[Read more…] about Dynamically create a phishing page based on the HTTP referer header

Enforcing better Active Directory passwords (Password audit part 3)

May 30, 2019 By Craig Hays Leave a Comment

Reading Time: 3 minutes

(This is the third and final post of a three part series on Microsoft Active Directory password quality auditing)

Following on from part 2 where we used DS-Internals to extract NT hashes and John the Ripper to crack them, in this post we cover what to actually do with all of this (usually worrying) information.

What to do with a list of cracked passwords

Now that John has done his good work, you will likely have a list of passwords and their associated user accounts from some of your users. Once you’ve gotten off the floor and climbed back into your chair, you may start to think: “This is great! We can see exactly who has bad passwords. If they were good we wouldn’t have cracked them so easily.” So now what…

[Read more…] about Enforcing better Active Directory passwords (Password audit part 3)
  • Page 1
  • Page 2
  • Go to Next Page »

Primary Sidebar

Newsletter

Want to get smarter about cyber security? Join my growing list of newsletter readers for exclusive news, reviews, how-tos, and more.

Craig Hays

© Craig Hays, 2006–2025

  • All Articles